And here is the second, final part of the tutorial. This week we will talk about two ways of doing the sashing and the assembling of the quilt. Here is the link to Part 1 in case you missed it :)
Let’s go and have some more sewing fun!
Extra
Mini Charm Pack Idea
How to work with a Mini Charm Pack!
@naebaerin had the cool idea to use a mini charm pack. It will of course yield “only” a smaller project, like pillow covers or a mini/baby quilt.
Using the precut size of 2.5″ and keeping the same ratio, you will have a finished block of 5.0″. And the sashing will be also exactly half the width aka 1.0″ finished. If you keep the 42 blocks in a 6 × 7 layout then you quilt will finish at 37″ × 43″.
For the full trimming instructions see Part 1. But here are the numbers for the mini charm pack block size: Place your ruler so that the 1.75″ marks are on the line between the charm square and the block ring. Cut the right and the top access off. Turn by 180 degrees and repeat at 5.5″ for step two.
As the bock ring finishes at 1.5″, you can use up all your skinny strips! E.g. a 1.0″ and a 1.75″ strip work in tandem. Or you add small scraps to a strip of 2.25″ inches to be used as pieced fabric. Or – as usual – a combination of the above :)
Block Style
My Personal Tryout: Sashing in a Block Style Version
Short excursion before we get to cutting and assembling the quilt top: I personally dislike sewing sashing. I do not mind the small strips between the blocks in each row. And I don’t even mind connecting the long strips to one side of said row… but then when you have to make sure that your blocks are really staggered on top of each other, that marking and figuring out where to pin… Maybe I don’t now a trick? But this will be the first quilt where I will totally go against everything I know about sashing – please don’t call the quilt police – and will try another version. Maybe I will like it better?!
Version 1: Make sashing a part of the block (Crazy Version)
I find the idea of simply sewing blocks together, where I can pin at seams, way more practical. Yes, this will result in more seams, more seam allowances and thus a higher use of sashing fabric/yardage. But I will try the idea with this quilt and see if I like it better :)
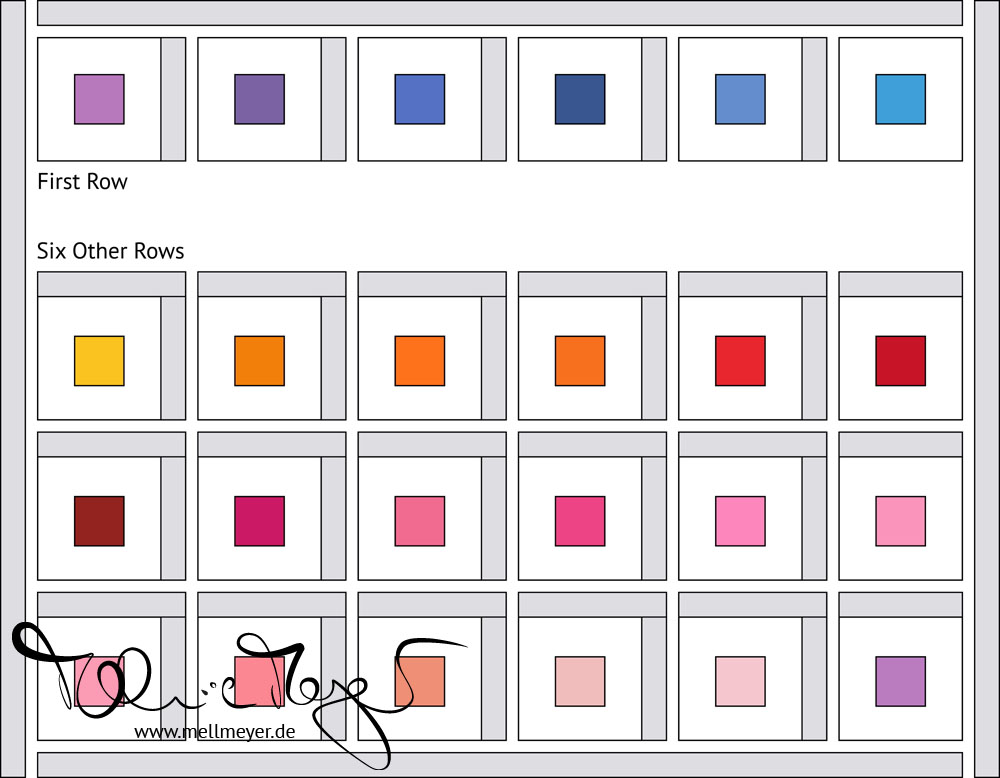
As I only want to avoid the hassle between rows and not on the outside, where I will simply sew longs strips to all four sides, I will not add the sashing in the same way to all my blocks.
(30) of my blocks will fully be constructed this way. The outmost right block in each row will not need a right side sashing. So (6) of my blocks will only get a top sashing. And the top row does not need top sashing. So (5) of the blocks will only get a right side sashing. I hope this graphic helps in understanding what I am up to…
Cutting:
(35) right-side sashings: 2.5″ × 10.5″
(30) top-side sashings: 2.5″ × 12.5″
(6) top-side sashings: 2.5″ × 10.5″
Outside strips: approx. 70″ (top & bottom) – approx. 86″ (left & rigth)
Cut (3) strips with a height of 10.5″. Sub cut two strips in (16) 2.5″ pieces each. Sub cut the third strip in (9) 2.5″ pieces, for a total of (41) pieces. Cut (2) strips with a height of 12.5″. Sub cut in (15) 2.5″ pieces each for a total of (30) pieces. Cut (8) strips with a height of 2.5″, connect and use as necessary for the outer borders.
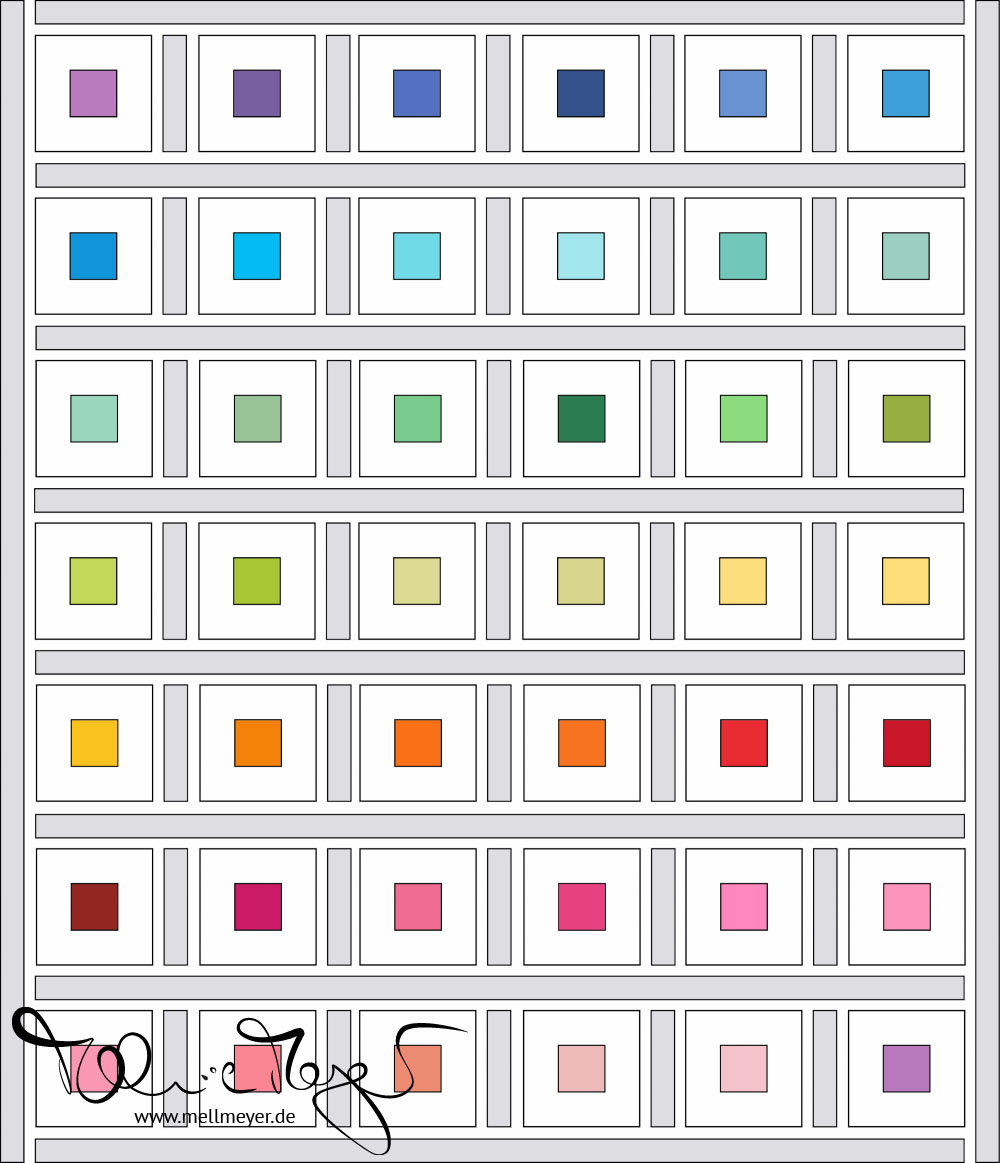
Assemble according to the diagram.
Traditional
Normal aka Traditional Sashing
But I guess most of you will want to do a “normal” sashing :)
Version 2: Normal sashing
Cutting:
(35) right-side sashings: 2.5″ × 10.5″
(8) horizontal strips: approx. 70″
(2) vertical strips: approx. 86″
Cut (2) strips with a height of 10.5″. Sub cut in (16) 2.5″ pieces each. Cut (1) strips with a height of 2.5“. Sub cut in (3) 10.5″ pieces, for a total of (35) pieces. Cut (18) strips with a height of 2.5″.
Assemble according to the diagram.
Sew the vertical sashing to all but the end blocks of each row. Sew the rows together. Piece the remaining strips together. Measure each row and cut sashing to match the length of the rows. Sew one strip between the rows and one on top and on the bottom. Repeat for the vertical borders.
Cutting for the Mini Charm Pack version
Cutting:
(35) right-side sashings: 1.5″ × 5.5″
(8) horizontal strips: approx. 35″
(2) vertical strips: approx. 43″
Cut (1) strips with a height of 5.5″. Sub cut in (28) 1.5″ pieces each. Cut (1) strips with a height of 1.5“. Sub cut in (7) 5.5″ pieces, for a total of (35) pieces. Cut (9) strips with a height of 1.5″.
Finish!
Last steps to finish your quilt
If necessary piece the backing. Layer the quilt top with batting and backing (quilt sandwich), baste and quilt as desired. Square up your quilt and bind using binding strips.
I hope you enjoyed the tutorial and will join me with your own projects. I am so looking forward to seeing your projects pop up in my feed. So please share your progress on social media using the hashtag #mm_charmscrappy & #mellmeyer_pattern. Feel free to tag me @mellmeyer. I look forward to seeing you posts!
Best wishes
xo Melanie