
I still can’t quite believe it myself: My Aviatrix Medallion is finally finished! #YEAH
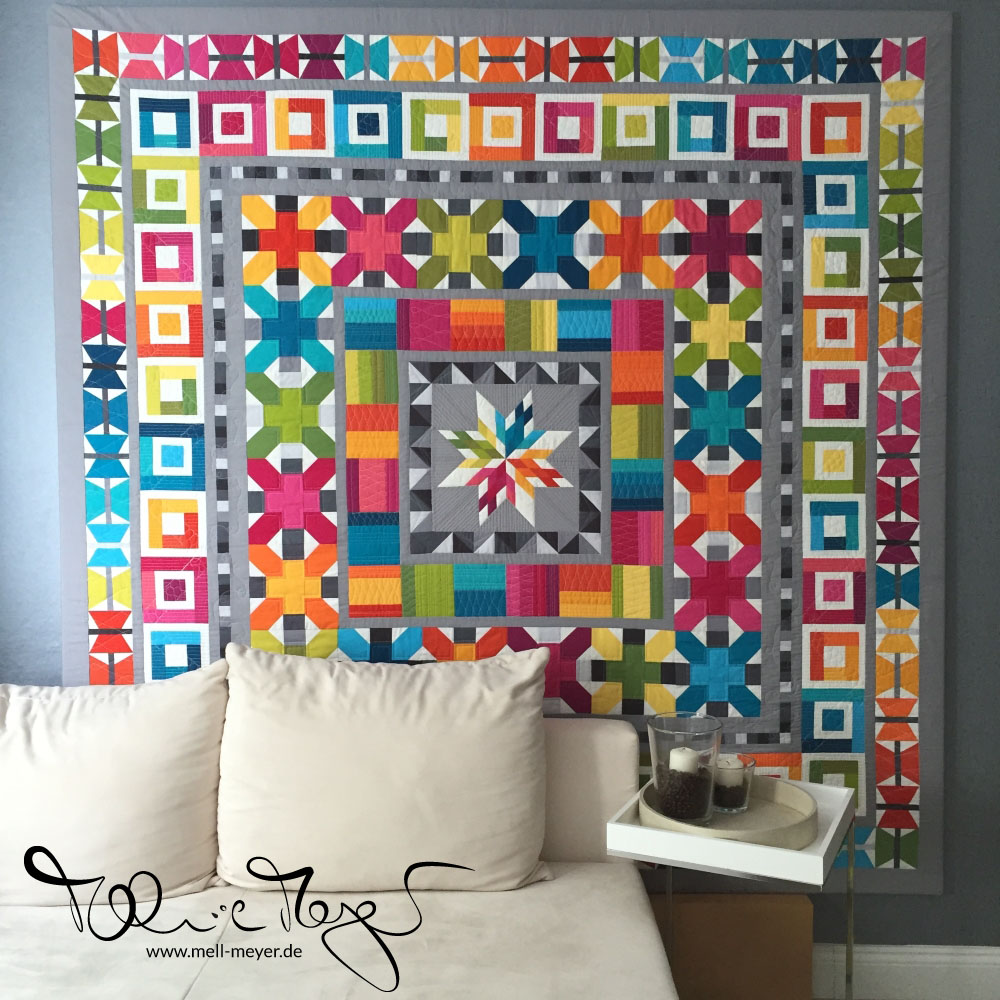
I took only 2 years, 2 month and 25 days or shall I say 817 days but who is counting :)
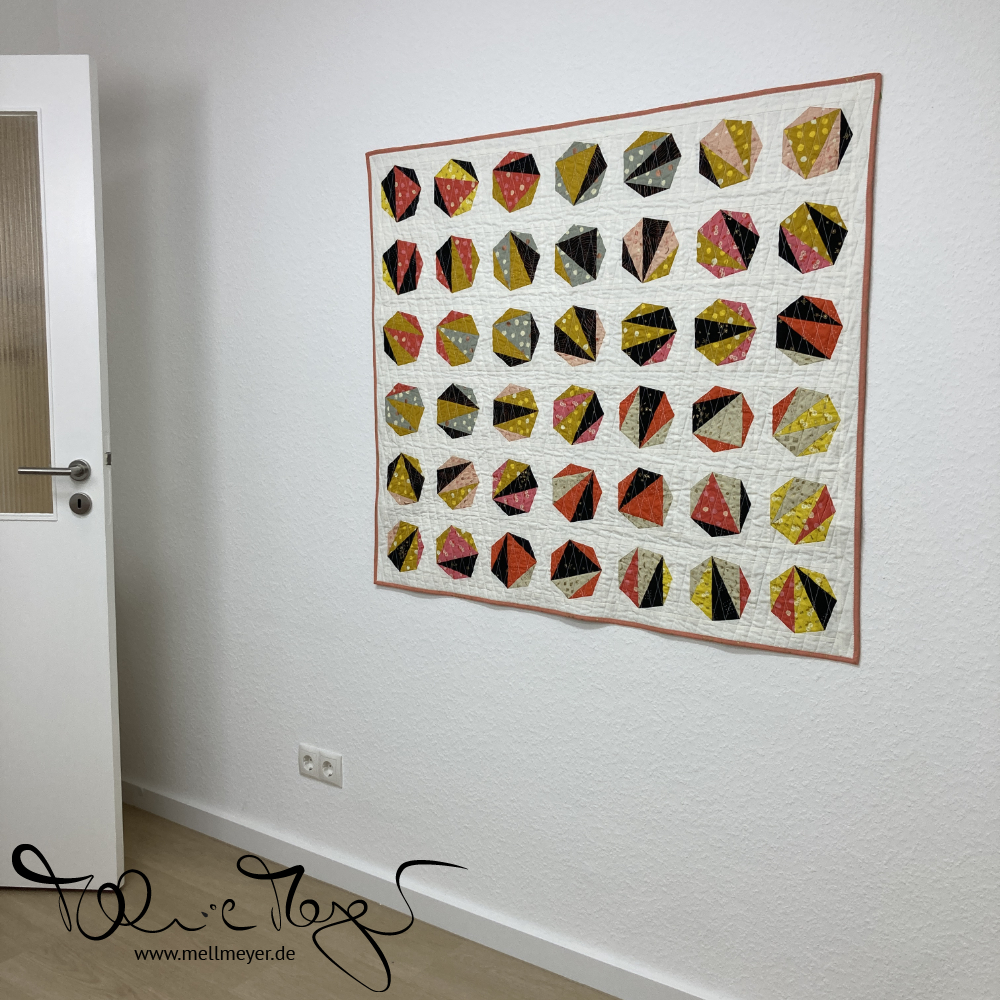
I wanted it to look like wall art and had this crazy idea of using a wooden frame, wall papered so it would be “invisible” on the wall and the quilt attached with Velcro on it. I know totally crazy, but it was the only way I could come up with, as I wanted it “stretched and stiff” and not “floppy” as with a normal sleeve. After some discussion on our last Patchwork Treffen, the girls came up with another solution to hang my quilt. Actually I did now “frame” it like a canvas painting.

With that twist and with seeing that after burying all the threads the chalk had finally rubbed off, the working time on this went down considerably. I still needed a wooden frame, which a good friend helped me built – or should I say – built for me. We built the frame to the size of the (slightly stretched) quilt. And after that was done, I just placed the quilt face down on my living room floor and stapled the border around the frame onto the backside of the wooden beams. As on a canvas painting :)
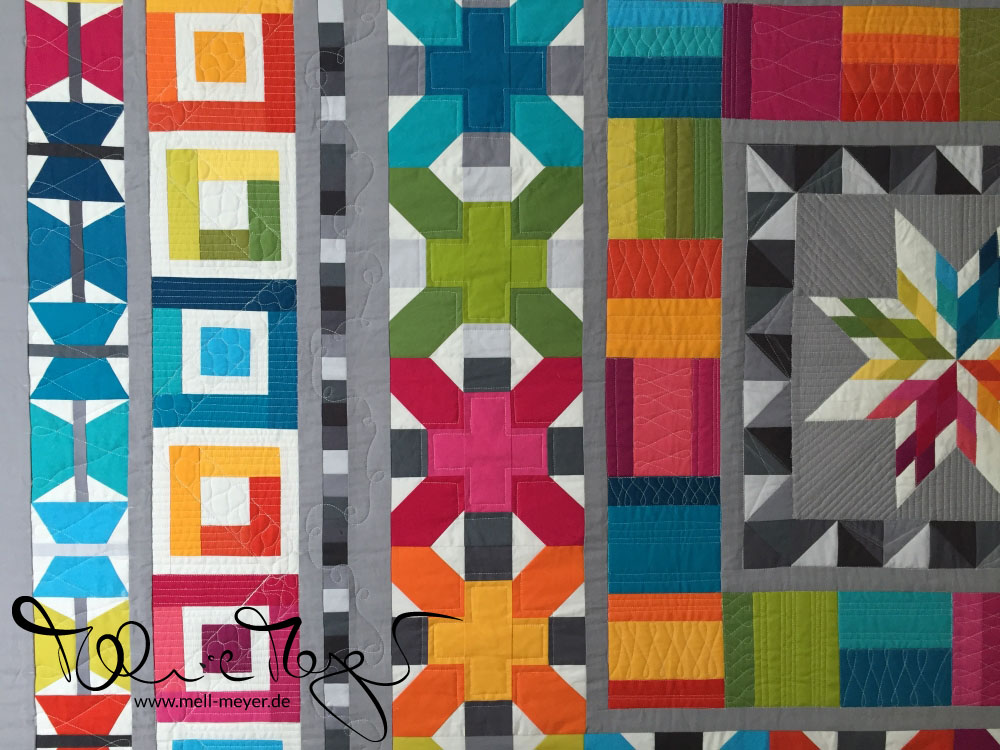
If you want to replicate the process. I found it worked best to draw a chalk line on the border that indicated how far we had to pull the quilt around. The distance will depend on where you measured your main quilt design to be on the border and how thick your wooden beams of the frame are. Then you just pull the quilt so far around that the chalk lines up with the backside edge of the beams. This way the border didn’t distort and did neither look wobbly or like a messed up diamond :)
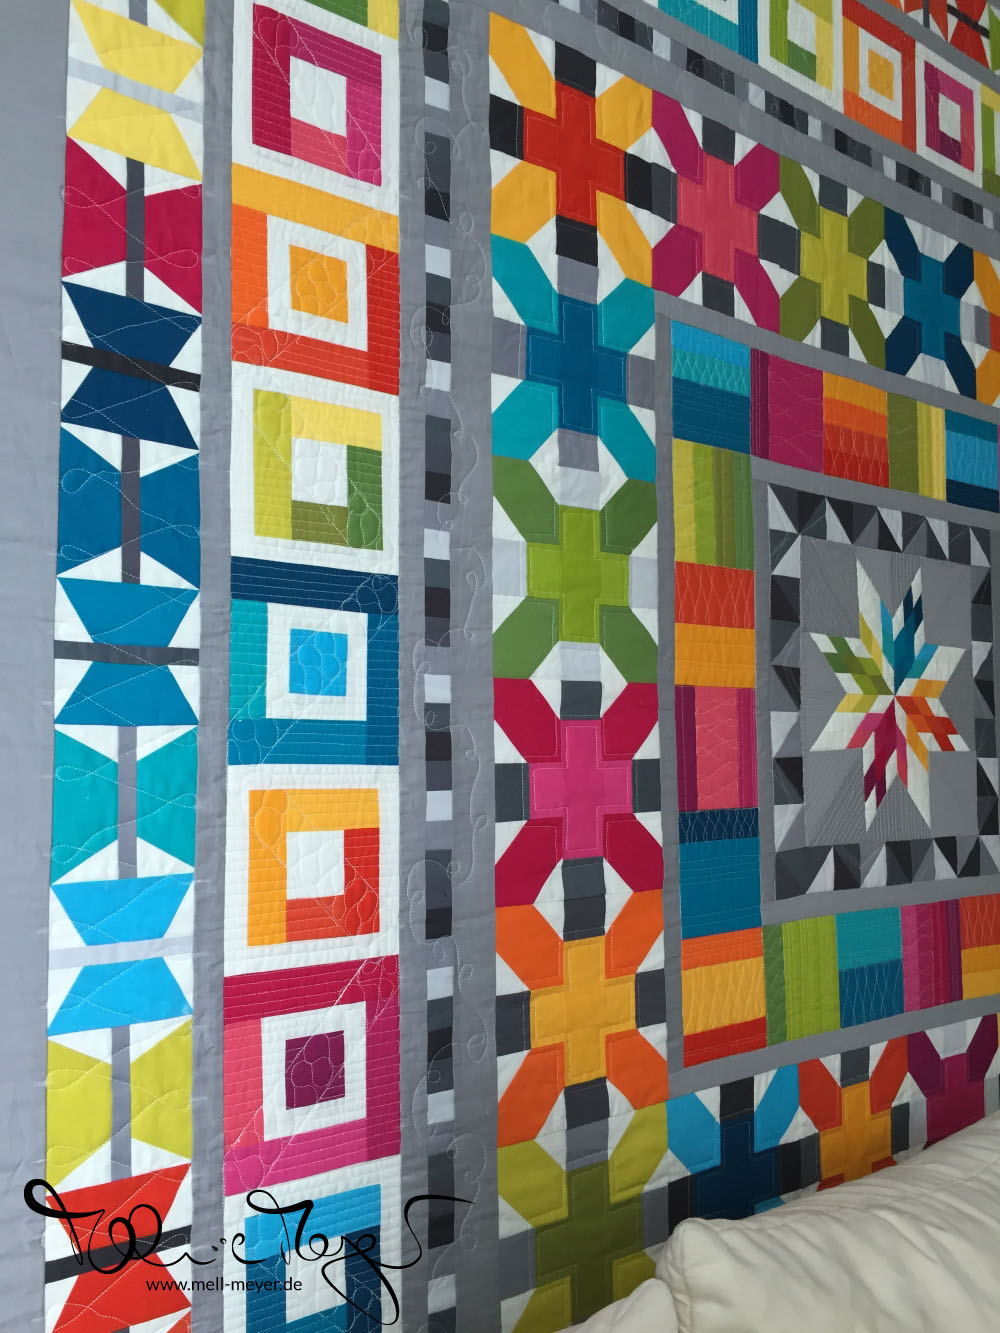
This solution might sound a little destructive with all the stapling. But because I knew, I would longarm it, the quilt had a really wide last border. This border is now stapled to the back of the frame. If I ever tire of the quilt as wall art, I can take it off the frame, resize the border to the intended size, bind it and it’s a normal quilt again.
What would we do without all the input, inspiration and help of those on- and offline quilty friends!
Stats
80*80″
size
27
fabrics
differs
block size
589
blocks
1,960
pieces
21st of Jul 16
finished
This is a finish of my Q3 Finish Along 2016 List.
Linking up at
Finish It Up Friday @ Crazy Mom Quilts and TGIFF (Thank Goodness It’s Finished Friday) and Whoop Whoop Friday @ Confessions Of A Fabric Addict.
FAQ
I’m thinking you didn’t use a kit and chose your own fabrics?
Thanks for the reminder! I forgot to link to my original post about the fabric choosing right at the start of the QAL.
I finally managed to look up the colors I used :)
And the result was quite unexpected to me, I would have guessed that I had used more of the pattern colors.
Violet(ish): Punch – Brt. Pink – Valentine – Pomegranate – Cerise
Orange(ish): Sunny – Papaya – Torch – Tangerine – Flame
Green(ish): Canary – Wasabi – Peapod – Bonsai – Grass
Blue(ish): Peacock – Breakers – Cyan – Oasis – Celestial
Gray: Shadow – Med. Grey – Graphite – Coal – Charcoal

What a fantastic way to display this quilt. Leaving the backing long is a wonderful solution for stapling it to your frame.
You had good vision for displaying it, and I think it worked very well. It’s stunning displayed this way as wall art, and for as long as quilts take, shouldn’t they be considered so?
If you didn’t want to staple through your quilt the next time, you could sew a fabric border to the edge, and leave the quilt to just cover the face of your frame. I’ve tried both, and both work well. It just depends on the look you’re after. I had one I didn’t want to chance damaging.
WOW WOW WOW
Very Impressive!
And I like the idea of using a wooden frame to hang it. Because it is a modern quilt, it needs a modern method for hanging! I will remember this idea!
It’s stunning! I’m thinking you didn’t use a kit and chose your own fabrics?
Thanks for the reminder! I forgot to link to my original post about the fabric choosing right at the start of the QAL.
I finally managed to look up the colors I used :)
And the result was quite unexpected to me, I would have guessed that I had used more of the pattern colors.
Violet(ish): Punch – Brt. Pink – Valentine – Pomegranate – Cerise
Orange(ish): Sunny – Papaya – Torch – Tangerine – Flame
Green(ish): Canary – Wasabi – Peapod – Bonsai – Grass
Blue(ish): Peacock – Breakers – Cyan – Oasis – Celestial
Gray: Shadow – Med. Grey – Graphite – Coal – Charcoal
This is just gorgeous! Thank you so much for sharing, I love all those colors!
What a clever solution. It’s lovely and I hope it brings you years of enjoyment.
Oh, Wow!! Your Aviatrix is gorgeous, Melanie, and so very perfect in that room. It looks great framed up like that. That was a brilliant idea to leave the edges unfinished for the ability of unstapling it and binding it in the future if you decide to. Really excellent addition to TGIFF. :D
Gorgeous!! I love your idea to stretch out on the frame.
Gorgeous! !
Oh my goodness! Congratulations on a spectacular and major finish! I know what it is like to finish an EPIC quilt like this one and it feels great! The quilt is beautiful. Your framing of the quilt is spectacular. Wow.
This is the MOST BEAUTIFUL quilt I have seen IN YEARS !
Bravo !
Belissimo…………..I truly hope I spelled that correctly.
Amazing finish! It looks so great on your wall, thank you for describing how you mounted it.
What an amazing and gorgeous quilt/painting! I love the bright colors and the design is so wonderful. Did you design this? If so it is wonderful. Thanks for sharing your finish. You should be very proud. K-
Very distinctive. Well worth the wait!
I have an Aviatrix Medallion Quilt top that has been waiting since last year to be quilted. Yours is simply magnificent and may finally inspire me to get mine finished. Great job!
This is super beautiful!!! I love this parttern and maybe I’ll make it one day:)
Stunning! Great idea for hanging … looks very professional!!!!
Well, this really is a finish of epic proportions! I know you must be thrilled everyday to pass by it! Right now my Facing East quilt is on my bed, and even though it is not really big enough, I still get a whole lot of satisfaction from sleeping under it!
This turned out fantastic, and I can’t wait to see it live! I’m sure this looks stunnng on the wall and that your birthday guests were blown away. Two thumbs!
This quilt is magnificent! Congratulations!
This is so fabulous and what a wonderful way to display it! It looks stunning!
It’s stunning and I love the way you’ve displayed it! Congratulations on your finish, and thank you, on behalf of the 2016 global FAL hosts, for taking part!
That is incredibly beautiful. Your framing is perfect. Thank you for sharing.
Pingback: Progress Q3 and Proposed List of Finishes Q4
Pingback: „Patchwork Forest“ Christmas Quilt Top